How to downgrade from OS X El Capitan back to OS X Yosemite<div class="field field-name-body field-type-text-with-summary field-label-hidden"><div class="field-items"><div class="field-item even" property="content:encoded"><p><a href='
http://www.imore.com/how-downgrade-os-x-el-capitan-back-os-x-yosemite' title="How to downgrade from OS X El Capitan back to OS X Yosemite"><img src='
http://www.imore.com/sites/imore.com/files/styles/large_wm_brw/public/field/image/2015/07/os-x-el-capitan-disk-utilities-hero.jpg?itok=XxoTKmj9' />[/url]</p> <p class="intro">If you decide the OS X El Capitan public beta just isn't for you, you can downgrade to OS X Yosemite.</p> <p>The
OS X El Capitan public beta is a way to test the next generation of Mac software. If it turns out you don't enjoy the process, or would prefer to wait and try again later, you can go back to
OS X Yosemite. Downgrading is a simple process, but it's also a bit of a chore. Don't worry, though, we'll walk you through it!<!--break--></p> <p>Note: If you're reading this article on the Mac you want to revert, either print it out first, or open it on iPhone, iPad, or another Mac so you can read along as you go.</p> <p>If you made a
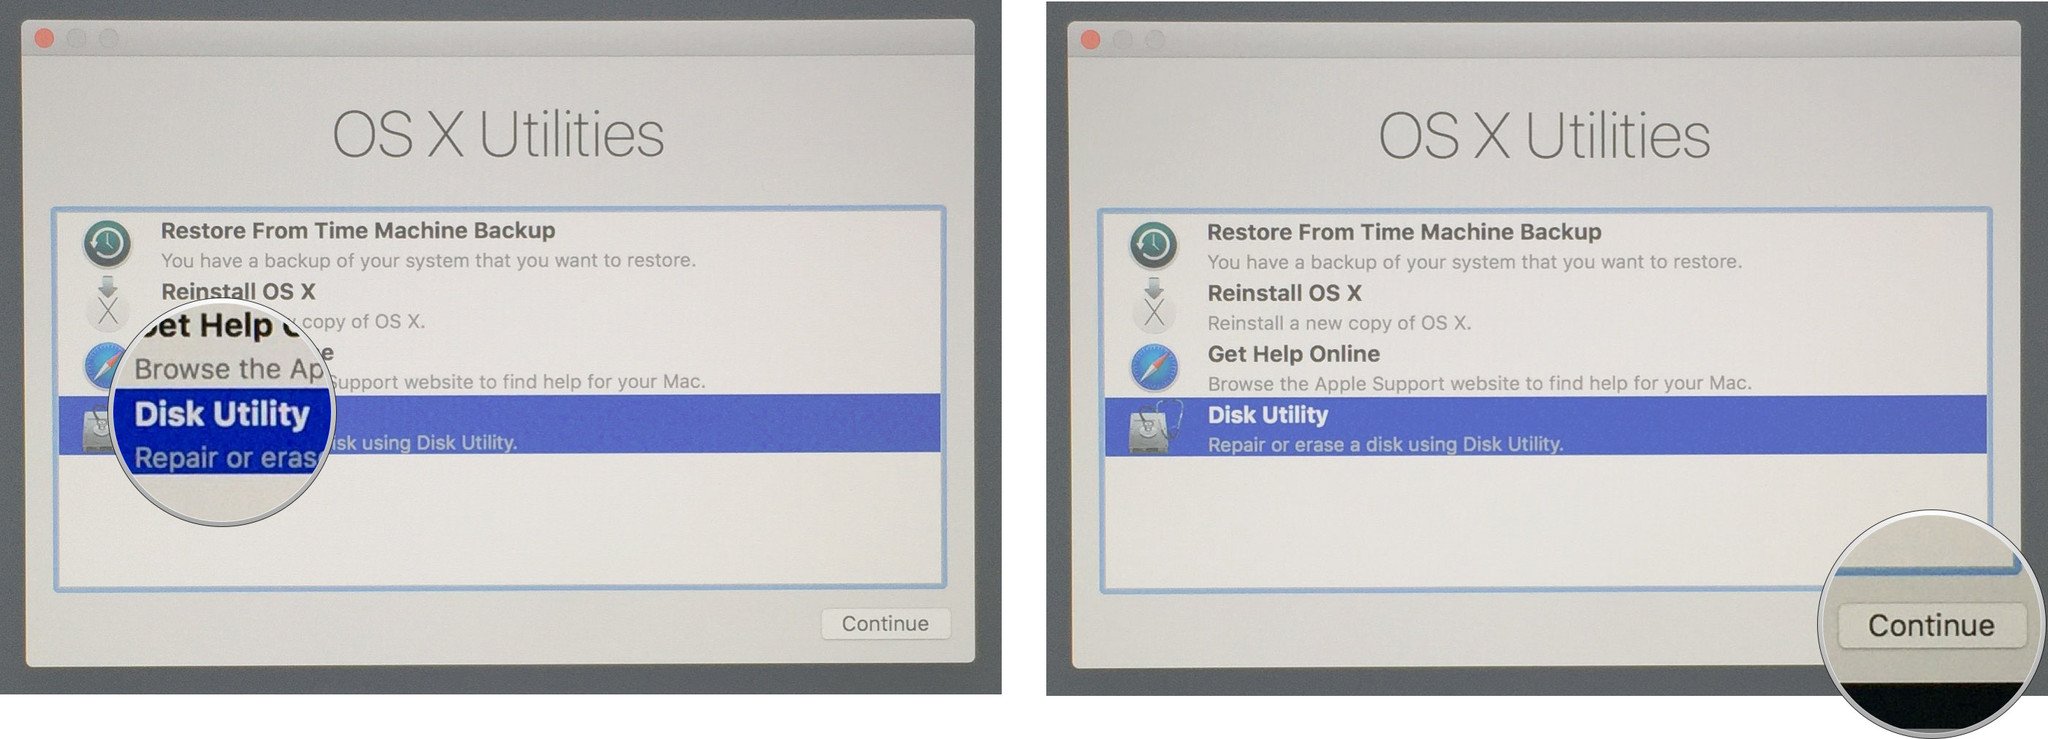
bootable OS X Yosemite install drive before you went on the El Capitan beta, then simply plug it in, reboot, hold down the Option key, and you'll be on your way.</p> <p>If not, you'll need to erase OS X El Capitan first, and then re-install.</p> <ul><li><a href="#recovery">How to erase OS X El Capitan[/url]</li> <li><a href="#downgrade">How to reinstall OS X Yosemite[/url]</li> <li><a href="#downgrade">How to restore your data from Time Machine[/url]</li> </ul><h2>How to erase OS X El Capitan</h2> <ol><li>Make sure your Mac is connected to the internet over W-Fi or Ethernet.</li> <li>Go to the <strong></strong> menu and select <strong>Restart...</strong>.</li> <li>Hold down <strong>Command+R</strong> while your Mac reboots.</li> <li>Click on <strong>Disk Utility</strong> in the OS X Utilities selector.</li> <li>Click <strong>Continue</strong>.
<a href='
http://www.imore.com/how-downgrade-os-x-el-capitan-back-os-x-yosemite' title="How to downgrade from OS X El Capitan back to OS X Yosemite"><img src='
?itok=OfibZL0z' />[/url]
</li> <li>Select your <strong>Startup Disk</strong>.</li> <li>Click on the <strong>Erase</strong> tap.</li> <li>Type in <strong>Macintosh HD</strong> for the name (or whatever you like.)</li> <li>Select <strong>Mac OS Extended (Journaled)* from the **Format</strong> list, if it isn't selected already.</li> <li>Click <strong>Erase</strong>.
<a href='
http://www.imore.com/how-downgrade-os-x-el-capitan-back-os-x-yosemite' title="How to downgrade from OS X El Capitan back to OS X Yosemite"><img src='
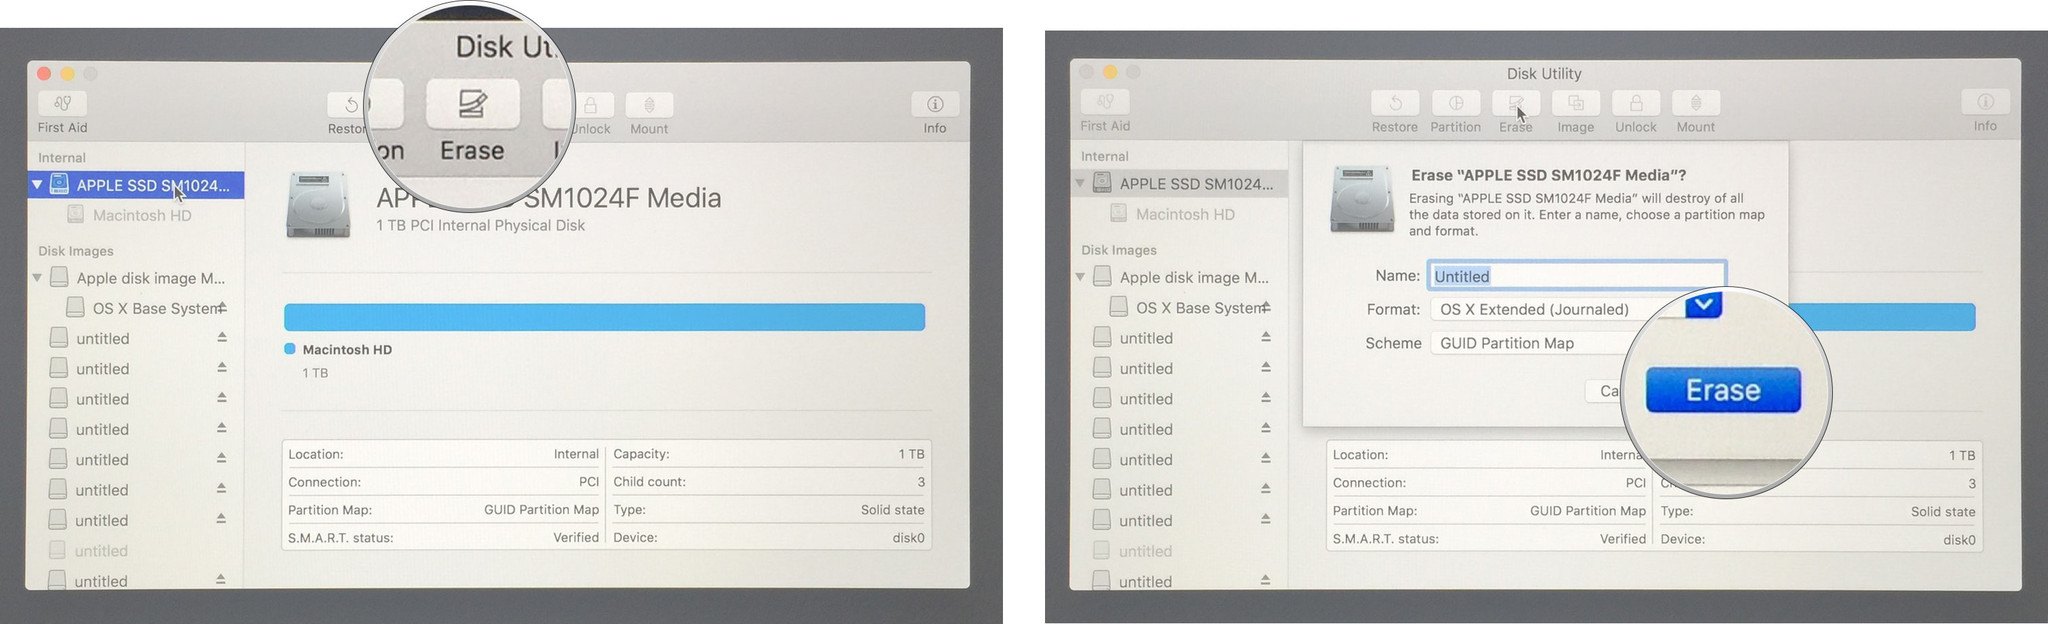
?itok=x-OWPSwc' />[/url]
</li> </ol><p>Once it's done, quit Disk Utility and get ready to reinstall.</p> <h2>How to reinstall OS X Yosemite</h2> <ol><li>Click on <strong>Reinstall OS X</strong> in the OS X Utilities selector.</li> <li>Click <strong>Continue</strong> on the <strong>OS X Yosemite Installer</strong>.
<a href='
http://www.imore.com/how-downgrade-os-x-el-capitan-back-os-x-yosemite' title="How to downgrade from OS X El Capitan back to OS X Yosemite"><img src='
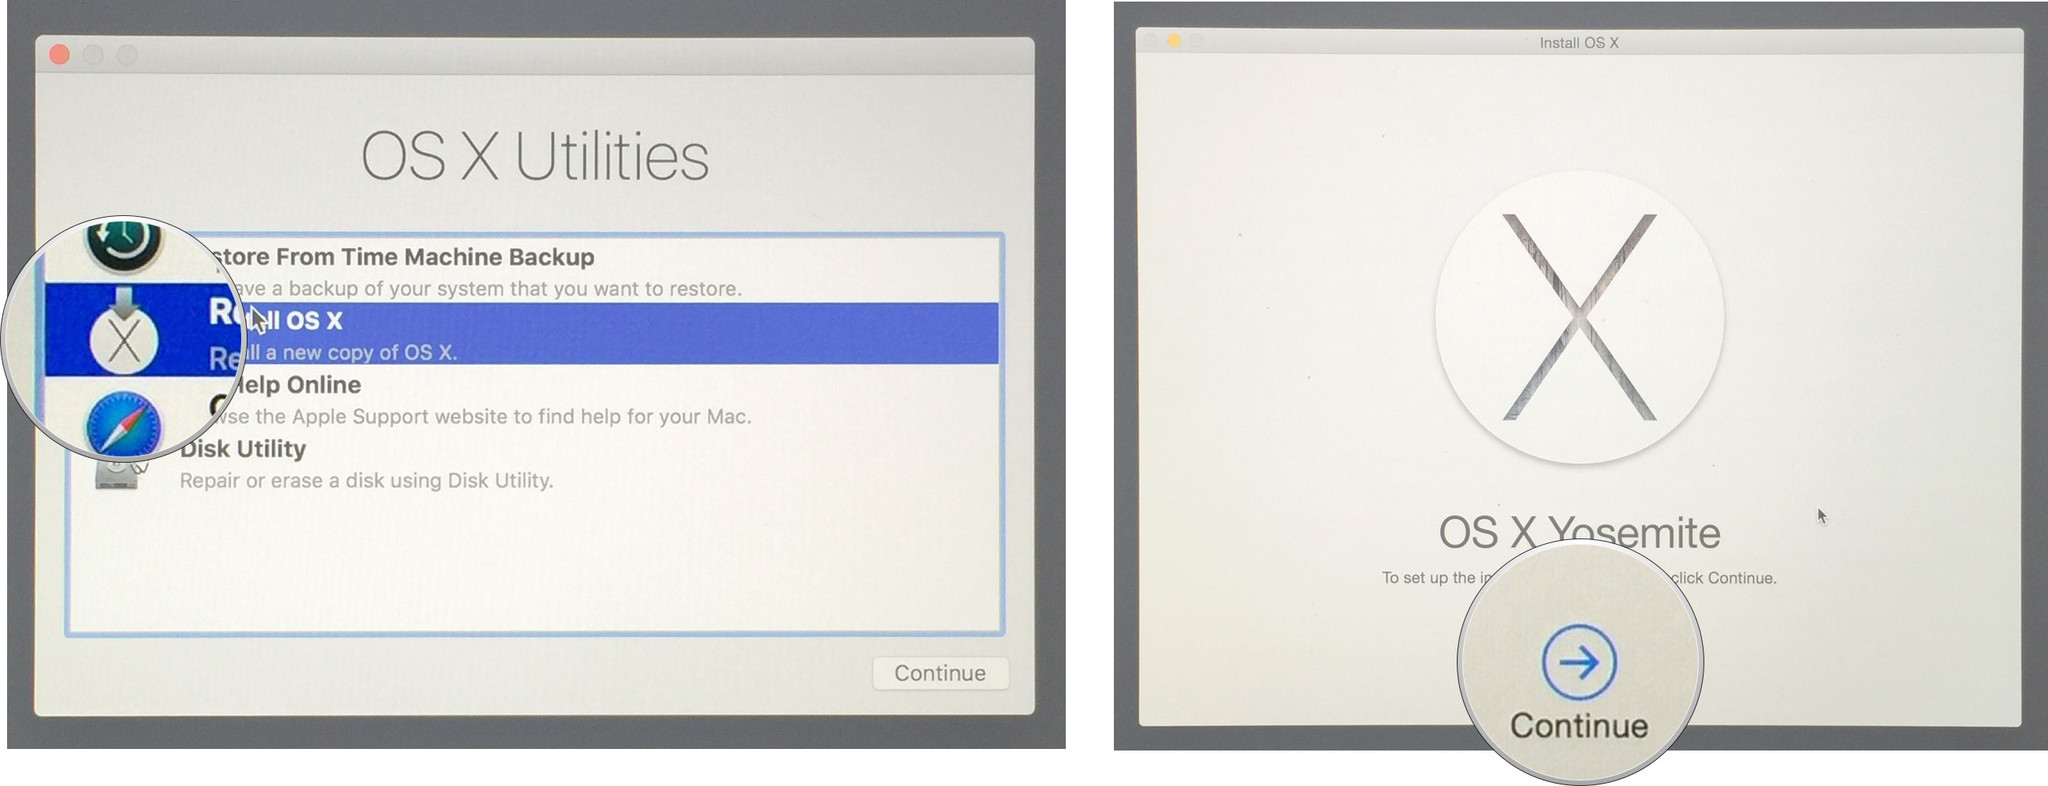
?itok=z6JbtRl0' />[/url]</br /></li> </ol><p>From this point on it's the same as a standard update, simply continue on and agree to the licensing terms as you go. When you're done, your Mac will reboot into OS X Yosemite.</p> <p>Note: Depending how old your Mac is, you may get an older version of the installer—typically the one that originally shipped on your Mac (That's especially true if you end up in Internet Recovery mode).</p> <p>If that happens, complete the installation of Lion, Mountain Lion, Mavericks, or whichever version you're offered, and when you're done and rebooted, go to the Mac App Store and re-run the OS X Yosemite update.</p> <h2>How to restore your data from Time Machine</h2> <p>You should be asked if you want to restore from Time Machine as part of the reinstallation process. If not, or if you choose not to, you can restore at any time.</p> <ol><li>Power up or restart your Mac.</li> <li>Hold down <strong>Command+R</strong> while your Mac boots.</li> <li>Click <strong>Restore from Time Machine Backup</strong> from the OS X Utilities menu.</li> <li>Click <strong>Continue</strong>.</li> <li>Read the <strong>Restore Your System</strong> page and click <strong>Continue</strong>.</li> <li>Select your Time Machine backup</li> <li>Click <strong>Continue</strong>.</li> <li>Select the most recent backup of your drive and click <strong>Continue</strong>. </li> </ol><p>Your Mac will then restore from Time Machine and reboot. The process can take a while so, depending on network speeds and the amount of data, so be patient.</p> <p>If you run into any trouble or have any questions, ask away in the comments!</p> <div class="devicebox"> <h3>
OS X El Capitan</h3> <div class="video"><div class="video_iframe"><iframe src="
http://www.youtube.com/embed/SYFDgJGfsZU?rel=0&autoplay=0&wmode=opaque&controls=2&autohide=1&showinfo=0" width="627" height="353" class="video-filter video-youtube vf-syfdgjgfszu" frameborder="0" allowfullscreen="allowfullscreen"></iframe></div></div> <!--/video--> <ul><li>
OS X El Capitan first look</li> <li>
OS X El Capitan FAQ</li> <li>
OS X El Capitan hub</li> <li>
OS X El Capitan discussion</li> </ul></div> <div> <style> <!--/*--><![CDATA[/* ><!--*/ <!--/*--><![CDATA[/* ><!--*/ <!--/*--><![CDATA[/* ><!--*/ .devicebox { background-color: #5CB8DB; border: 1px solid #E2E9EB; float: right; display: block; margin: 0 0px 10px 10px; max-width: 350px; overflow: hidden; width: 50%; } .devicebox h3 { background: #8D98BD; font-family: "camptonmedium",sans-serif; font-size: 20px; margin-bottom: 0; margin-top: 0; padding: 0; text-align: center; } .devicebox h3 a { display: block; line-height: 30px; padding: 0 10px; } .devicebox h3 a:hover { background: #7e88aa; text-decoration: none; } .devicebox .video { margin: auto; } .devicebox p, .entry-content .devicebox p > img, .devicebox img { margin: 0px; max-width: 100%; padding: 0px; } div .devicebox *, div .devicebox li, div .devicebox a:active, div .devicebox a:hover, div .devicebox a:link, div .devicebox a:visited { color: #fff; } .devicebox a:hover { text-decoration: underline; } .devicebox p, .devicebox ul li, .devicebox ol li { font-size: 16px; padding: initial; } .devicebox ul { margin: 0; padding: 0.5em 1em 1em 30px; } .devicebox ul li { display: list-item; line-height: 24px; list-style: disc outside none; } .devicebox ul li:before { display: none; } .devicebox p ~ p { padding: 0px 15px 15px; line-height: 1.25; } .devicebox p:first-of-type + p { padding: 15px; } div *:last-of-type + .devicebox, div *:last-of-type + div ~ .devicebox { float: none; margin: 0 auto 30px; max-width: 700px; min-height: 225px; position: relative; width: 100%; } div *:last-of-type + .devicebox .video, div *:last-of-type + div ~ .devicebox .video { bottom: 0px; left: 50%; position: absolute; right: 0px; top: 30px; } div *:last-of-type + .devicebox .video_iframe, div *:last-of-type + div ~ .devicebox .video_iframe { height: 100%; padding: 0px; } div *:last-of-type + .devicebox h3 + p, div *:last-of-type + div ~ .devicebox h3 + p { bottom: 0; left: 50%; overflow: hidden; position: absolute; right: 0; top: 30px; width: 50% } div *:last-of-type + .devicebox h3 + p img, div *:last-of-type + div ~ .devicebox h3 + p img { float: right; height: 100%; width: auto; } div *:last-of-type + .devicebox ul, div *:last-of-type + div ~ .devicebox ul, div *:last-of-type + .devicebox p, div *:last-of-type + div ~ .devicebox p { width: 43%; } @media all and (max-width: 500px) { .devicebox { float: none; margin: 0 0 30px; max-width: 100%; width: 100%; } div *:last-of-type + .devicebox .video, div *:last-of-type + div ~ .devicebox .video { left: 0; position: relative; top: 0; } div *:last-of-type + .devicebox .video_iframe, div *:last-of-type + div ~ .devicebox .video_iframe { padding-bottom: 56.25%; } div *:last-of-type + .devicebox h3 + p, div *:last-of-type + div ~ .devicebox h3 + p { left: 0; position: relative; top: 0; } div *:last-of-type + .devicebox ul, div *:last-of-type + div ~ .devicebox ul { width: auto; } } /*--><!]]]]]]><![CDATA[><![CDATA[>*/ /*--><!]]]]><![CDATA[>*/ /*--><!]]>*/ </style></div> </div></div></div><br clear='all'/>
<a href="
http://rc.feedsportal.com/r/234565609746/u/49/f/616881/c/33998/s/482ead95/sc/28/rc/1/rc.htm" rel="nofollow"><img src="
http://rc.feedsportal.com/r/234565609746/u/49/f/616881/c/33998/s/482ead95/sc/28/rc/1/rc.img" border="0"/>[/url]
<a href="
http://rc.feedsportal.com/r/234565609746/u/49/f/616881/c/33998/s/482ead95/sc/28/rc/2/rc.htm" rel="nofollow"><img src="
http://rc.feedsportal.com/r/234565609746/u/49/f/616881/c/33998/s/482ead95/sc/28/rc/2/rc.img" border="0"/>[/url]
<a href="
http://rc.feedsportal.com/r/234565609746/u/49/f/616881/c/33998/s/482ead95/sc/28/rc/3/rc.htm" rel="nofollow"><img src="
http://rc.feedsportal.com/r/234565609746/u/49/f/616881/c/33998/s/482ead95/sc/28/rc/3/rc.img" border="0"/>[/url]
<img src="[url]http://da.feedsportal.com/r/234565609746/u/49/f/616881/c/33998/s/482ead95/sc/28/a2.img" border="0"/>[/url]<img width="1" height="1" src="
http://pi.feedsportal.com/r/234565609746/u/49/f/616881/c/33998/s/482ead95/sc/28/a2t.img" border="0"/><img width='1' height='1' src='

' border='0'/><img src="
http://feeds.feedburner.com/~r/TheIphoneBlog/~4/2GsDYiyBv-U" height="1" width="1" alt=""/>
Source:
How to downgrade from OS X El Capitan back to OS X Yosemite
