How to back up and restore your Mac with Time Machine<div class="field field-name-body field-type-text-with-summary field-label-hidden"><div class="field-items"><div class="field-item even" property="content:encoded"><p><a href='
http://www.imore.com/how-set-and-restore-time-machine-backup' title="How to back up and restore your Mac with Time Machine"><img src='
http://www.imore.com/sites/imore.com/files/styles/large_wm_brw/public/field/image/2015/01/time-machine-hero.jpg?itok=u3UNxhLg' />[/url]</p> <p class="intro">Time Machine is OS X's built-in backup software.</p> <p>The feature was introduced with OS X 10.5 Leopard, and it's been there ever since. If you've never used it, Time Machine is one of the easiest ways to back up your Mac, and is great for recovering individual files you've deleted or restoring your entire hard drive in the event of a catastrophe.<!--break--></p> <h2>How does Time Machine work?</h2> <p>Time Machine works with any hard disk connected to your computer via USB, FireWire, or Thunderbolt; it also supports Apple's Time Capsule and backup disks connected over a network, provided the disks support Apple File Protocol (AFP) file sharing. As long as the disk is available to your Mac, you can use it for a Time Machine backup.</p> <p>When enabled, Apple's backup software takes periodic snapshots of all your files and catalogs them on an external hard drive you have plugged in or a Time Capsule you've hooked up to your network. It backs up the entire contents of your hard disk hourly, daily and weekly; as the drive gets full, Time Machine will delete the oldest backups and replace them with newer versions.</p> <p>This is better than your traditional "Copy a bunch of files to a cloud service" or "clone a disk to an external hard drive" because you don't have to restore your hard drive en masse if you lose a single file—Time Machine can retrieve specific images, folders, and projects from its backup because of its layered snapshot system.</p> <p>If you're using OS X Yosemite or later on a laptop and enable Time Machine, you'll also automatically get a feature called
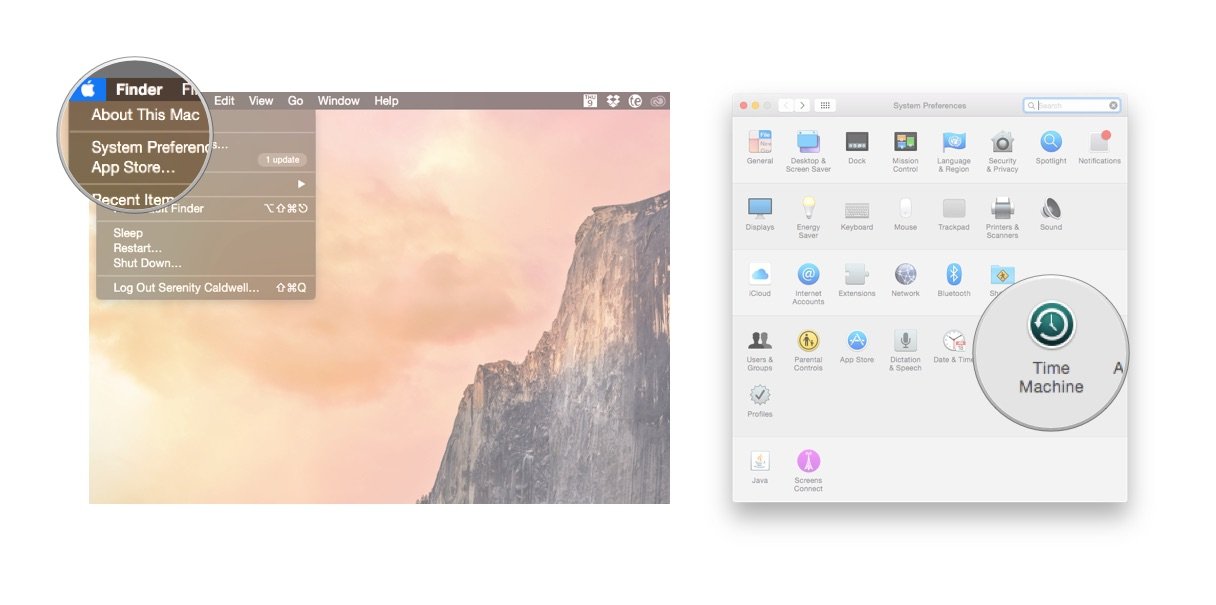
Local Snapshots; this allows your laptop to back itself up once a day (and once a week) while you're away from your Time Machine drive.</p> <p>Local Snapshots does take up some of your hard drive with its backups, but if you start to run low, it will automatically purge old backups so that you have at least 20 percent free space on your drive.</p> <h2>Can I exclude data from my backups?</h2> <p>Yup. In <strong>System Preferences > Time Machine</strong>, click the <strong>Options</strong> button to select any files you'd prefer didn't make their way onto your backup drive.</p> <h2>How to enable Time Machine backups on your Mac</h2> <ol><li>From the Apple menu, select <strong>System Preferences</strong>.</li> <li>Choose the <strong>Time Machine</strong> icon.
<a href='
http://www.imore.com/how-set-and-restore-time-machine-backup' title="How to back up and restore your Mac with Time Machine"><img src='
?itok=tnELzJB-' />[/url]
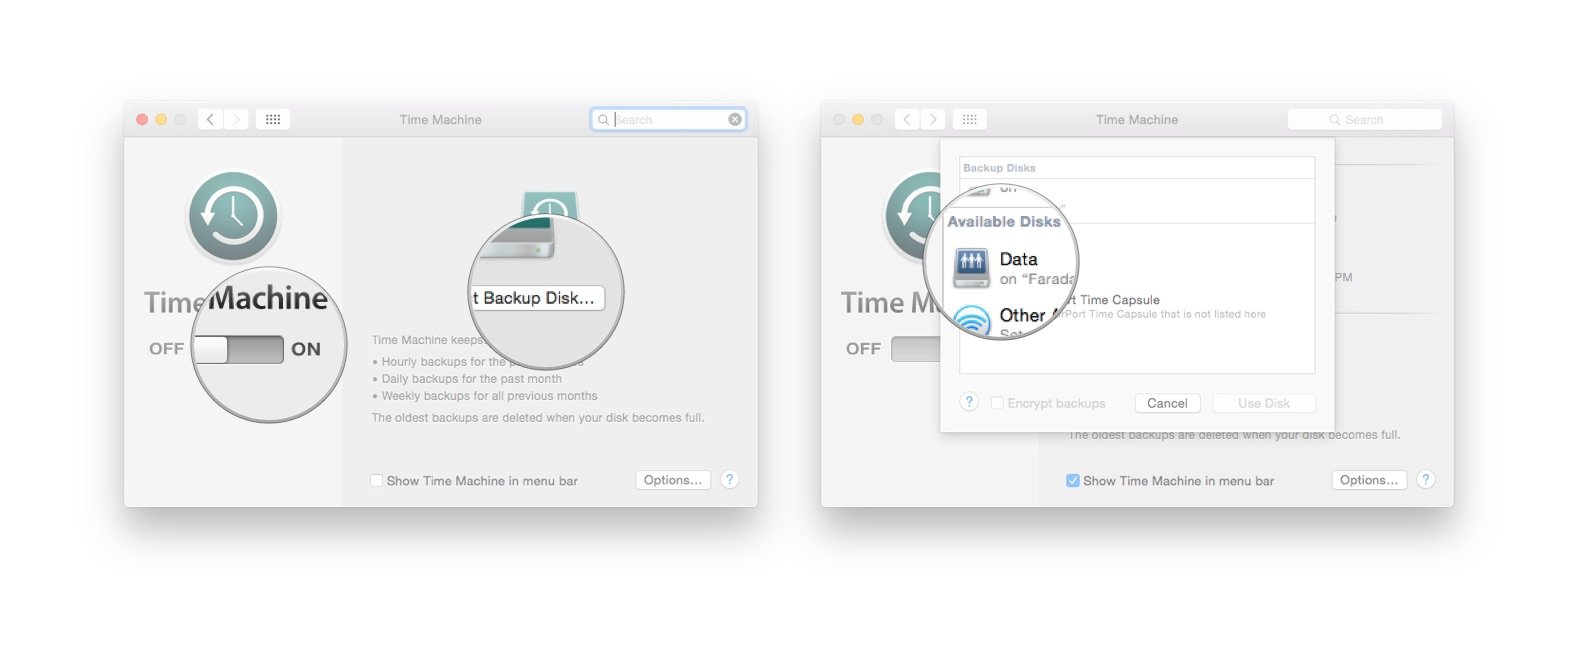
</li> <li>Turn the Time Machine slider slider <strong>On</strong>.</li> <li>Click <strong>Select Backup Disk</strong> to choose the disk you'd like to use as a Time Machine backup.
<a href='
http://www.imore.com/how-set-and-restore-time-machine-backup' title="How to back up and restore your Mac with Time Machine"><img src='
?itok=qEUmQUQX' />[/url]
</li> <li>Time Machine will format the hard drive for backups and will then start your first backup within two minutes.</li> </ol><h2>How to restore files from a Time Machine backup</h2> <ol><li>From the Apple menu, select <strong>System Preferences</strong>, then choose the <strong>Time Machine</strong> icon.</li> <li>Select the <strong>Show Time Machine in menu bar</strong> checkbox.
<a href='
http://www.imore.com/how-set-and-restore-time-machine-backup' title="How to back up and restore your Mac with Time Machine"><img src='

?itok=BEfEfpDg' />[/url]
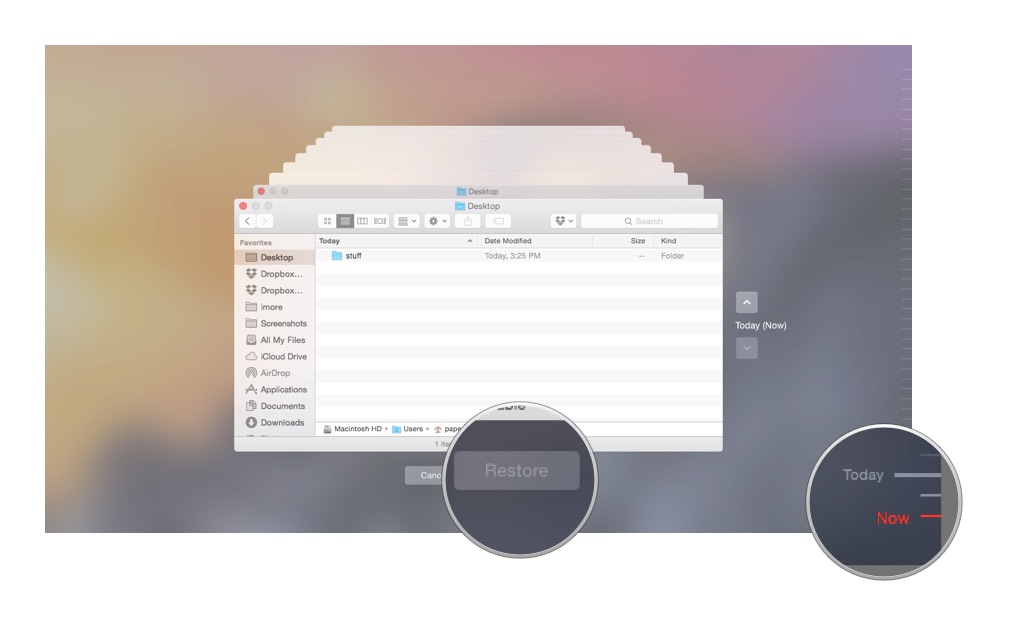
</li> <li>From the Time Machine menu, select <strong>Enter Time Machine</strong>.</li> <li>You'll be taken to the Time Machine window. Here you can navigate to the file or folder you'd like to restore.</li> <li>Find the file or folder in question, then click the <strong>Restore</strong> button.
<a href='
http://www.imore.com/how-set-and-restore-time-machine-backup' title="How to back up and restore your Mac with Time Machine"><img src='
?itok=LBz2z_U9' />[/url]
</li> <li>Time Machine will copy that file back to its original location on your hard disk.</li> </ol><h2>How to restore your hard drive from a Time Machine backup</h2> <p>Whether you're having major problems with your current hard drive or upgrading to a new Mac, Time Machine can help you get back to business.</p> <ol><li>Power up your Mac and hold down the <strong>Command</strong> and <strong>R</strong> keys to enter the OS X Recovery Partition. Your Mac should boot to a screen that says <strong>OS X Utilities</strong>.</li> <li>Select <strong>Restore from Time Machine Backup</strong> and click <strong>Continue</strong>.</li> <li>Read the info on the <strong>Restore Your System</strong> page and click <strong>Continue</strong>.</li> <li>Select your Time Machine backup and click <strong>Continue</strong>.</li> <li>Select the most recent backup of your hard disk and click <strong>Continue</strong>. Your Mac will then restore the Time Machine backup; once it's done it will restart.</li> </ol><p>If you've had to replace it with a stock drive that has nothing on it—not even OS X—you won't be able to boot from the OS X Recovery Partition. But fear not, you can get the recovery rolling from the Time Machine backup disk itself: Just hold down the <strong>Option</strong> key when you start your Mac; you'll be able to select the Time Machine backup disk as your startup drive, and go from there.</p> <h2>Let the good times roll</h2> <p>I hope this helps you get going with Time Machine—you never know when you'll have to recover a file or a disk, and it's better to be safe than sorry. Do you use Apple's backup feature? If not, why? Let us know in the comments.</p> <p>
Peter Cohen contributed to an earlier version of this article.</p> </div></div></div><br clear='all'/>
<a href="
http://rc.feedsportal.com/r/238386633600/u/49/f/616881/c/33998/s/4a4444dc/sc/15/rc/1/rc.htm" rel="nofollow"><img src="
http://rc.feedsportal.com/r/238386633600/u/49/f/616881/c/33998/s/4a4444dc/sc/15/rc/1/rc.img" border="0"/>[/url]
<a href="
http://rc.feedsportal.com/r/238386633600/u/49/f/616881/c/33998/s/4a4444dc/sc/15/rc/2/rc.htm" rel="nofollow"><img src="
http://rc.feedsportal.com/r/238386633600/u/49/f/616881/c/33998/s/4a4444dc/sc/15/rc/2/rc.img" border="0"/>[/url]
<a href="
http://rc.feedsportal.com/r/238386633600/u/49/f/616881/c/33998/s/4a4444dc/sc/15/rc/3/rc.htm" rel="nofollow"><img src="
http://rc.feedsportal.com/r/238386633600/u/49/f/616881/c/33998/s/4a4444dc/sc/15/rc/3/rc.img" border="0"/>[/url]
<img src="[url]http://da.feedsportal.com/r/238386633600/u/49/f/616881/c/33998/s/4a4444dc/sc/15/a2.img" border="0"/>[/url]<img width="1" height="1" src="
http://pi.feedsportal.com/r/238386633600/u/49/f/616881/c/33998/s/4a4444dc/sc/15/a2t.img" border="0"/><img width='1' height='1' src='

' border='0'/><img src="
http://feeds.feedburner.com/~r/TheIphoneBlog/~4/rp6KzTdyoSA" height="1" width="1" alt=""/>
Source:
How to back up and restore your Mac with Time Machine
