How to Get Your iPhone Ready for iOS 18Apple officially releases iOS 18 and iPadOS 18 on Monday, September 16, bringing a host of new features to existing iPhones and iPads, such as new Home Screen customization options, an overhauled Control Center, a revamped Photos app, Mail improvements, and
more.

This article covers some of the things you can do to prepare your iPhone or iPad for Apple's latest mobile operating system, including storage maintenance tips, backup advice, and a few other useful tidbits to consider before upgrading. First though, you'll need to make sure your device is compatible with the new software.
<h2>Is My iPhone Compatible With iOS 18?</h2>
iOS 18 is compatible with the iPhone XR, and therefore also the iPhone XS and iPhone XS Max models with the same A12 Bionic chip.
In other words, iOS 18 is compatible with the same iPhone models as iOS 17:
<div style="float: left; width: 50%;">
<ul><li>iPhone 15</li>
<li>iPhone 15 Plus</li>
<li>iPhone 15 Pro</li>
<li>iPhone 15 Pro Max</li>
<li>iPhone 14</li>
<li>iPhone 14 Plus</li>
<li>iPhone 14 Pro</li>
<li>iPhone 14 Pro Max</li>
<li>iPhone 13</li>
<li>iPhone 13 mini</li>
<li>iPhone 13 Pro</li>
<li>iPhone 13 Pro Max</li></ul></div><div style="float: right; width: 50%;">
<ul>
<li>iPhone 12</li>
<li>iPhone 12 mini</li>
<li>iPhone 12 Pro</li>
<li>iPhone 12 Pro Max</li>
<li>iPhone 11</li>
<li>iPhone 11 Pro</li>
<li>iPhone 11 Pro Max</li>
<li>iPhone XS</li>
<li>iPhone XS Max</li>
<li>iPhone XR</li>
<li>iPhone SE (2nd generation)</li>
<li>iPhone SE (3rd generation)</li></ul></div>
<div style="clear:both;"></div>iPadOS 18 drops support for
iPad models with the A10X Fusion chip, therefore iPadOS 18 is compatible with the following iPad models:
<div style="float: left; width: 50%;"><ul><li>iPad Pro: 2018 and later</li>
<li>iPad Air: 2019 and later</li></ul></div><div style="float: right; width: 50%;">
<ul>
<li>iPad mini: 2019 and later</li>
<li>iPad: 2020 and later</li></ul></div>
<div style="clear:both;"></div>Note that iOS 18 will come pre-installed on new iPhone 16 models when they launch on
Friday, September 20.
<h2>Reclaim Device Storage Space</h2>
Before you attempt to make the leap to iOS 18, you'll first want to make sure your device has adequate space to download and install the new operating system over the air.
With that in mind, it's worth looking at what apps you currently have installed on your devices and whether you really need them. Swipe through your home screen and check inside your folders to root out any long-forgotten apps that are taking up precious storage space.
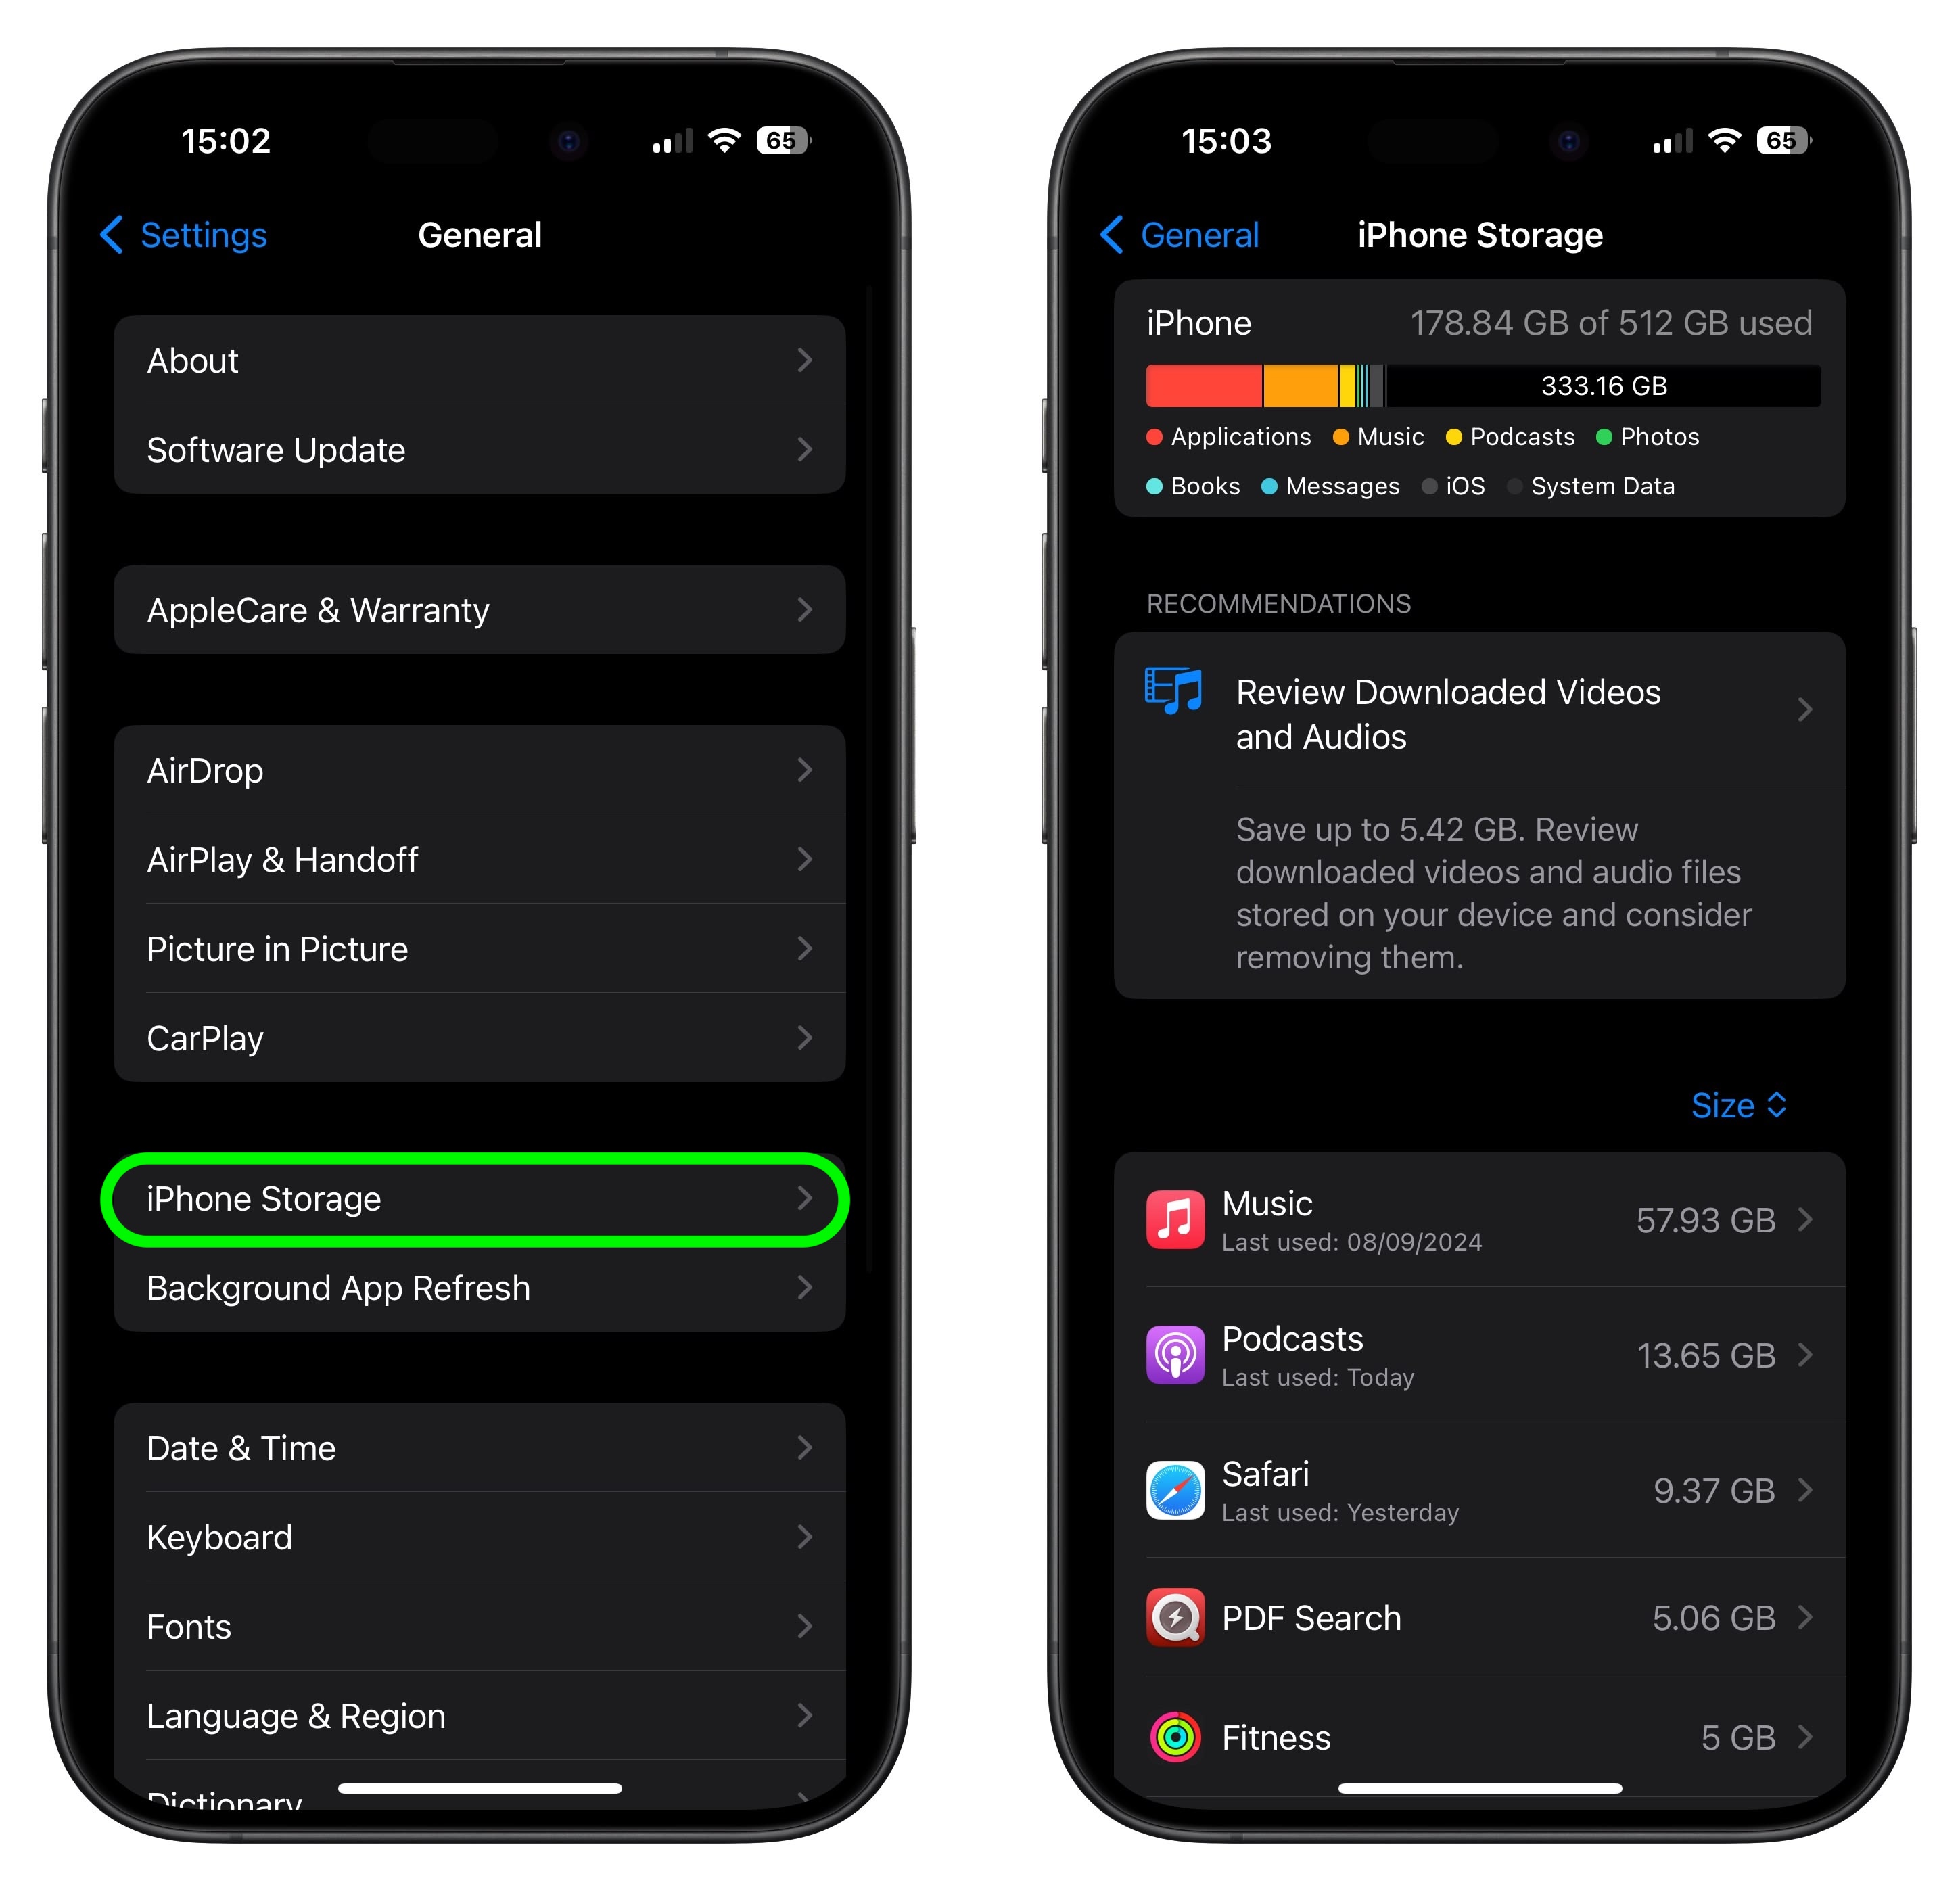
You can delete apps by holding a finger on them and tapping the X that appears at the corner of their icon. Alternatively, go to <strong>Settings ➝ General ➝ iPhone/iPad Storage</strong>, tap any apps you don't use, and select <strong>Delete App</strong>. Note that this action can't be undone, but be ruthless – you can always re-install removed apps at a later date if you change your mind.
Check on the size of any social media or messaging apps you have installed, such as Facebook and WhatsApp. These apps can often balloon in size after long periods of activity because of chat history, media caching and the like, so you might want to delete and reinstall them to start afresh.
Also, be sure to heed any personal recommendations on the iPhone Storage screen, like keeping high-resolution photos in iCloud and smaller-size versions on your device, or letting iOS automatically offload any apps you don't use often.
<h2>Make an Archived Backup of Your Device on Mac</h2>
It's best practice to have a local backup of your device stored on your computer in case something goes awry, or the worst happens and installation of iOS 18 fails. If you need to downgrade shortly after installing a new iOS update, making an archived local backup beforehand is necessary, otherwise you won't be able to revert back to iOS 17/iPadOS 17 if things go wrong.
<ol>
<li>Plug your iPhone into your Mac using the supplied cable.</li>
<li>Allow the accessory to connect by clicking <strong>Allow</strong> in the dialog prompt.</li>
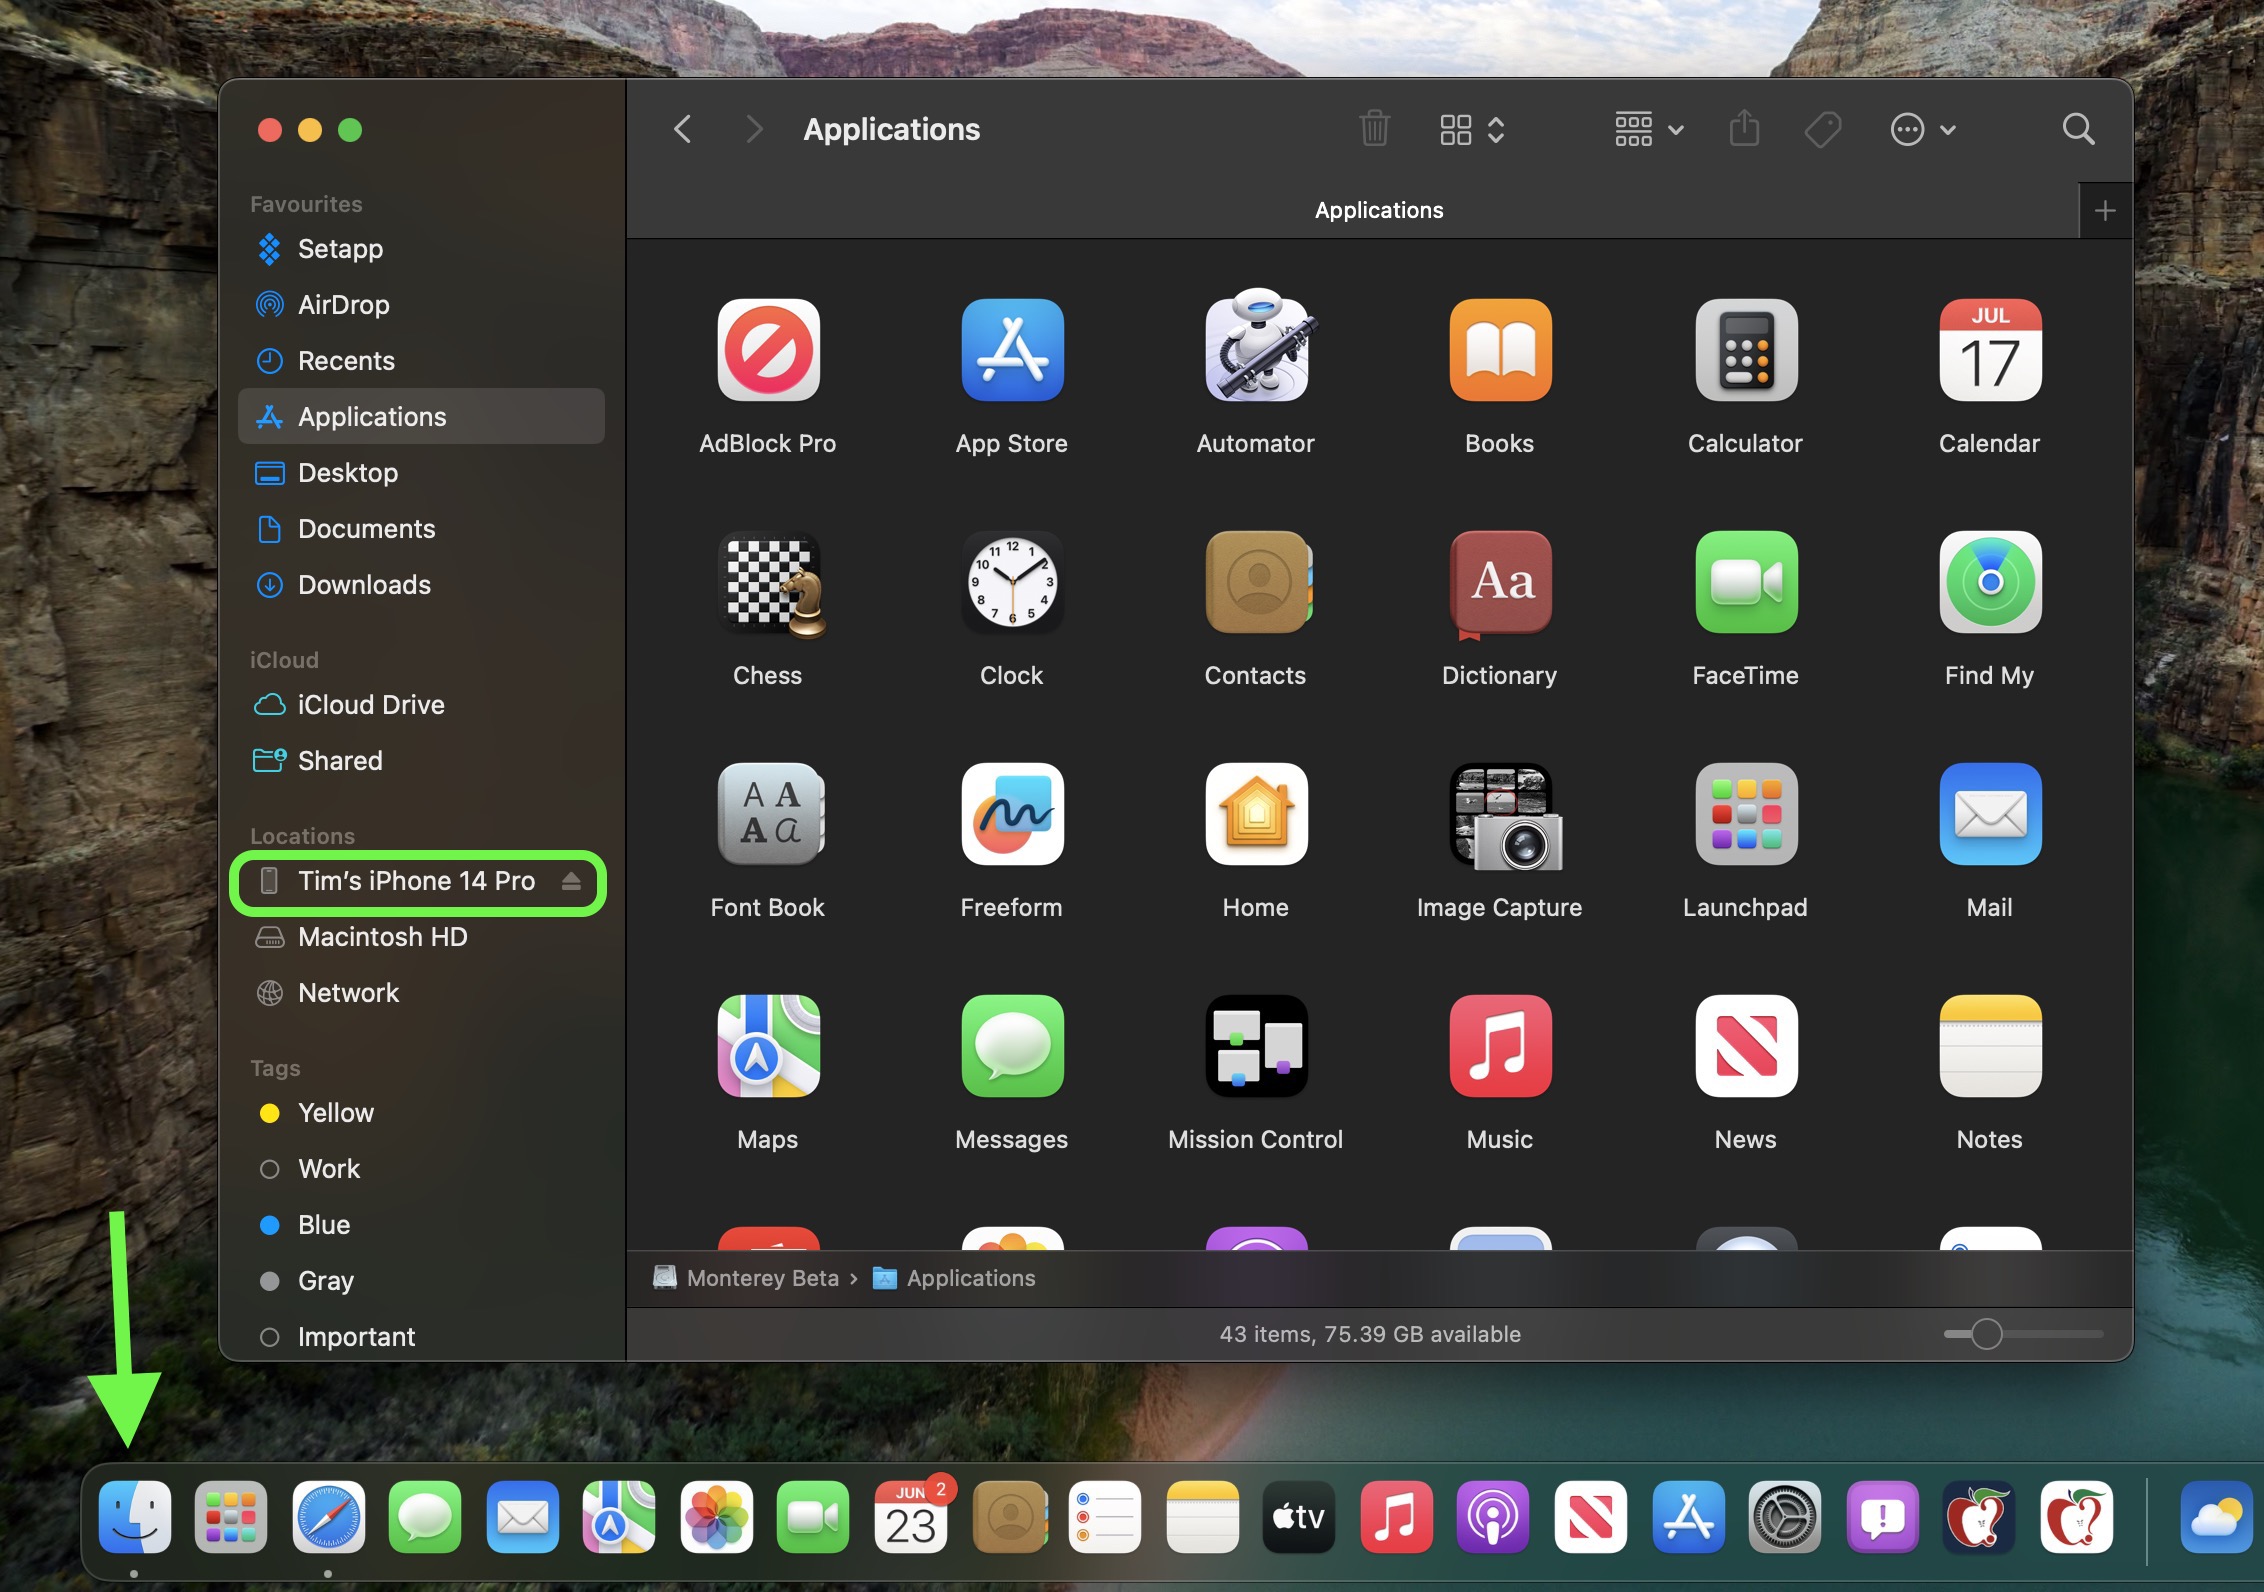
<li>Open a <strong>Finder</strong> window by clicking the Finder icon in the Dock.</li>
<li>Click your iOS device's name in the sidebar.
<li>If this is the first time connecting your device to your Mac, click <strong>Trust</strong> in the Finder window.

<li>Tap <strong>Trust</strong> on your device when prompted, then enter your passcode to confirm.</li>
<li>In the General tab, click the circle next to where it says <strong>Back up all of the data on your iPad to this Mac</strong>.</li>
<li>If you want to encrypt the backup, check the box next to <strong>Encrypt local backup</strong>, then enter a password to protect your data.</li>
<li>If you don't want to create an encrypted backup, or you've already set up encrypted backups, click <strong>Back Up Now</strong>. When the backup is finished, you can find the date and time of the last backup in the <strong>General</strong> tab, just above the Manage Backups button.

<li>Lastly, archive the backup: Select <strong>Manage Backups ➝ Select Backup</strong>, then right-click the backup and choose <strong>Archive</strong>. This protects it from being overwritten by the next local backup or automatically deleted if your Mac is low on storage space.</li>
</ol>
Remember that this backup will not be overwritten when you manually or automatically back up your iPhone in the future, so you can restore it at any time by using the <strong>Restore Backup...</strong> option in the same Finder screen.
<h2>Make an Archived Backup of Your Device on Windows</h2>
The iTunes app is still the main tool for managing a connected iPhone on Windows.
<ol>
<li>Plug the iPhone into your Windows PC.</li>
<li>In iTunes, click the <strong>iPhone</strong> button at the top left.</li>
<li>Click <strong>Summary</strong>.</li>
<li>If you want to encrypt the data, select the <strong>Encrypt local backup</strong> option and set a password.</li>
<li>Click <strong>Back Up Now</strong>.</li>
<li>Click <strong>Manage Backups</strong>.</li>
<li>Right-click the backup you created and choose <strong>Archive</strong>. This extra step prevents the backup from being overwritten by the next local backup or automatically deleted if the computer runs low on storage space.</li>
</ol>
<h2>Installing iOS 18</h2>
When iOS 18 and iPadOS 18 becomes available (likely around 10:00 a.m. Pacific Time/1:00 p.m. Eastern Time on the official release day, based on past releases) as an over-the-air update, make sure your device is fully charged before you start the process over Wi-Fi, as it may take some time to complete.
To check that the update is available, go to <strong>Settings ➝ General ➝ Software Update</strong>, and wait a moment for your device to contact Apple's servers. If you're in no rush, you can wait for iOS 18 to be delivered to your iPhone when you next plug it into your computer.
Note that the first release versions of iOS 18 and iPadOS 18 don't include Apple Intelligence features, with Apple set to introduce the first Apple Intelligence capabilities in an update coming next month.<div class="linkback">Related Roundups:
iOS 18,
iPadOS 18</div><div class="linkback">Related Forums:
iOS 18,
iPadOS 18</div>
This article, "
How to Get Your iPhone Ready for iOS 18" first appeared on
MacRumors.comDiscuss this article in our forums
Source:
How to Get Your iPhone Ready for iOS 18
